Bubbled Brayer Backgrounds
block printing ink + brayer + bubble wrap = dots!
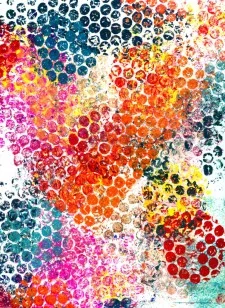
Printing with bubble wrap is easy and the imperfect imprints are so inviting. If you would like to explore other printing techniques (using a brayer and the same type of ink/paint) you’ll find instructions on making a gelatin printing plate and creating gelatin prints.
Gather materials.
Speedball block printing ink or acrylic paint.
Small soft rubber brayer. For years I have used 2" Speedball Soft Rubber Brayers. They roll smoothly & effortlessly. Clean up with dish soap and water. Tip: It helps to have two brayers because one can be used for paint and the other for rolling along the back of paper to make an imprint.
Paper. Bristol paper or heavy card stock are smooth and work well for bubble wrap printing. You can also use watercolor paper as I used for the examples.
Ink a brayer with block printing ink or acrylic paint.
Roll a stripe of ink/paint onto bubble wrap.
Place the painted side of the bubble wrap on a piece of paper.
Roll a dry brayer gently on the back of the bubble wrap. This transfers an imprint of the dots to your paper.
Repeat the printing process with different colors. Block printing ink dries quickly, so you can reuse the bubble wrap to layer one color over another color and create interesting combinations.
Variations: Cut the printed papers into artist trading cards, note cards, bookmarks or gift tags. Or do a switch — cut the bubble wrap into different shapes and use as stamps! Try this technique in an altered book, on a loose art journal page, in a journal or as an art journal background.

